Learning how to add font to Canva helps you move beyond basic templates and create designs that feel more personal, polished, and consistent. Whether you are building social media posts, business cards, invitations, presentations, or brand graphics, the right font can make your message easier to recognize and remember.
This guide walks you through the upload process, the rules to know before you start, and the smart habits that keep your Canva designs clean, readable, and on-brand.
Why Learning How To Add Font To Canva Matters
Custom fonts matter because they give your designs a voice that generic layouts cannot always deliver. Before you upload a paid typeface, you can test headline moods with a font generator for stylish text and creative fonts, because this kind of tool helps you create and compare creative lettering ideas before you commit to a complete Canva brand setup. When you choose a font with purpose, your graphics feel more intentional across ads, flyers, thumbnails, and client-facing materials.
A font can make a brand feel modern, playful, formal, luxurious, bold, friendly, or technical. That is why adding a custom font to Canva is not just a design trick; it is a brand-consistency step that helps your audience recognize your work faster. If you use Canva for business, the goal is not to upload every font you like, but to upload the few typefaces that support your message clearly.
Check Your Canva Plan And Font Rights First
Canva does not treat custom font uploading like a standard free feature, so you should confirm your account access before you begin. In most cases, you need Canva Pro, Canva Teams, Canva Education, Canva for Nonprofits, or another plan that includes Brand Kit or Brand Hub tools. If you do not see the upload option, your plan type is usually the first thing to check.
You also need the legal right to use the font, especially if the design will support a business, client, product, event, or advertisement. A free personal-use font may look perfect, but it may not allow commercial use, embedding, or brand distribution. Always read the license before uploading because Canva asks you to confirm that you have permission to use the file.
Prepare The Right Font File Before Uploading
The smoothest Canva font upload starts with the correct file type and a clean folder. Canva commonly supports TTF, OTF, and WOFF files, so you should avoid uploading ZIP folders, preview images, PDFs, or font files from platforms that restrict redistribution. If your font arrives in a compressed folder, extract it first, then upload the actual font files one by one or as a related group.
Creative projects often need different moods, so think about the final design before choosing a typeface. For example, when you are designing invitations, save-the-date cards, or romantic Canva templates, a wedding font generator can help you study elegant lettering styles before you select a licensed font file for upload. This keeps your decision practical because you are testing the visual direction before adding anything permanent to your Brand Kit.
Upload Every Font Weight And Style
A common mistake is uploading only the regular version of a font and expecting Canva to create true bold, italic, light, or extra-bold versions automatically. Many font families store each style as a separate file, so the regular, bold, italic, black, thin, and medium versions may all need their own uploads. When you upload the full family, Canva can give you more accurate choices inside the editor.
This matters even more for themed graphics where the lettering style carries the design. If you create team posters, game-day banners, or athletic social posts, a sports font generator can help you compare strong varsity-style text before you decide which licensed font family belongs in Canva. Uploading the complete font family gives you flexibility without forcing fake bold effects that can make letters look uneven.
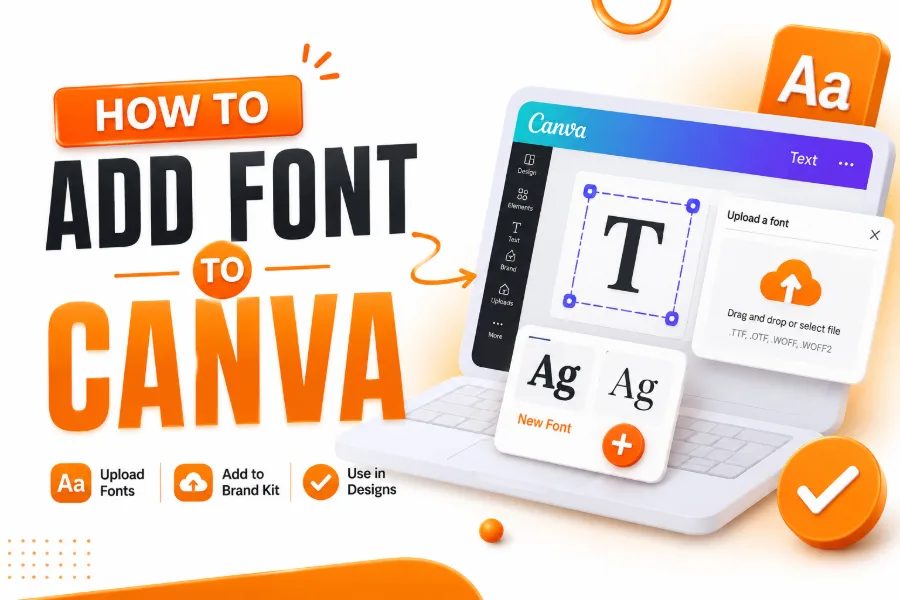
How To Upload Fonts Through Brand Kit
To upload a font on desktop, log in to Canva and open the Brand area from the left-side menu. Choose your Brand Kit, scroll to the font section, select the option to upload a font, then choose the font file from your computer. Canva will usually ask you to confirm that you own the font or have the right license before the upload completes.
After the upload, your font should appear inside your Brand Kit and in the font menu when you edit text. If you manage more than one brand, make sure you upload the font to the correct kit, not a test kit or an old client folder. This simple habit prevents confusion when you switch between brands, campaigns, and design templates.
How To Use Uploaded Fonts In A Canva Design
Once the font is uploaded, open a design and select the text box you want to edit. Click the font dropdown, search for the name of your uploaded font, or look for the uploaded-font section if Canva groups it there. Apply the font to headings, subheadings, body copy, captions, or buttons depending on the role you want it to play.
Do not use your custom font everywhere just because you added it. A strong Canva design usually needs a clear font hierarchy, with one font for headings, one readable option for longer text, and sometimes one accent font for small decorative moments. This approach makes your design easier to scan and helps your custom font feel special instead of overwhelming.
How To Add Fonts To Canva On Mobile
You can also upload fonts from the Canva mobile app when your account supports Brand Kit access. Open the app, go to the menu, choose Brand, select your Brand Kit, then move to the font area and use the upload option. Pick the font file from your phone storage, cloud drive, or downloads folder, then confirm the license when Canva asks.
Mobile uploading is useful when you work on the go, but desktop is still easier for organizing large font families. If a font family has ten files, place them in a clearly named folder on your computer first so you can upload the right versions. This reduces mistakes and helps you avoid adding duplicates with unclear file names.
Fix Common Canva Font Upload Problems
If the upload button is missing, check your plan, your team permissions, and whether you are inside the correct Brand Kit. If Canva rejects the file, confirm that you are uploading TTF, OTF, or WOFF rather than a ZIP folder or unsupported format. If the font uploads but does not show, refresh the browser, reopen the editor, or try a new text box.
Some errors are caused by the font file itself. The file may be corrupted, too large, blocked by licensing restrictions, or built in a way Canva cannot process correctly. If you bought the font from a marketplace, download a fresh copy from your account and confirm that the license allows the type of use you need.
Understand Font Licensing For Business Designs
Font licensing is one of the most important parts of learning how to add fonts to Canva because legal permission affects how you can use the final design. A personal license may allow birthday cards or hobby graphics, while a commercial license may be needed for logos, packaging, ads, client files, and products for sale. The safest approach is to keep the license document in the same folder as the font files.
Licensing also matters when you work with a team. If several people use the same uploaded font inside a shared Canva workspace, your license may need to cover multiple users or brand-wide use. When in doubt, buy the proper license before uploading, because fixing a font-rights problem after publishing a campaign can be expensive and stressful.
Build A Cleaner Brand Font System
Your Brand Kit should not become a storage closet for every typeface you download. Choose a small set of fonts that cover your real design needs, such as a display font, a heading font, a body font, and one optional accent font. This keeps your Canva workflow faster because you do not waste time scrolling through too many similar choices.
A clean font system also improves consistency across your marketing materials. If your Instagram posts, YouTube thumbnails, website graphics, PDFs, and ads all use the same font rules, your audience starts to recognize your brand more easily. This is especially useful for small businesses in the USA that need professional visuals without hiring a designer for every small update.
Pair Custom Fonts With Readability In Mind
A beautiful font can still fail if people cannot read it quickly. Use decorative fonts for short headings or accents, but use simple, readable fonts for paragraphs, pricing details, instructions, disclaimers, and calls to action. Good design is not only about style; it is about helping your reader understand the message without effort.
Test your Canva design at the size people will actually see it. A font that looks great on a desktop monitor may become cramped on a phone screen or blurry in a small social media preview. Before publishing, zoom out, preview on mobile, and make sure your most important words stay clear.
Use Custom Fonts For Different Canva Projects
Custom fonts can improve many Canva projects, but each project needs a slightly different approach. For a presentation, your font should look professional on large slides and remain readable from a distance. For social media posts, your font needs stronger visual personality because people scroll quickly and decide within seconds whether to stop.
For printed materials, pay close attention to spacing, contrast, and font weight. Thin letters can disappear on flyers, business cards, stickers, and packaging if the print size is too small. Choose a weight that holds up well in print, then export a test copy before ordering a large batch.
Keep Uploaded Fonts Organized Over Time
As your design library grows, font organization becomes a real productivity advantage. Use clear font names, upload complete font families, and remove outdated fonts that no longer align with your brand direction. If you manage client accounts, separate each client’s Brand Kit so you do not accidentally use the wrong typeface.
It also helps to keep a simple brand note that explains when each font should be used. For example, you can state that one font is for headlines, another is for body text, and a third is only for seasonal campaigns. This saves time for everyone who edits Canva templates and keeps designs from drifting away from the original brand style.
Conclusion
How to add font to Canva becomes easier when you treat the process as part of your branding system, not just a quick upload task. Start with the right Canva plan, use supported font files, confirm your license, upload every needed style, and test the result in real designs before using it across important projects.
When you combine custom fonts with clean hierarchy, readable layouts, and a focused Brand Kit, Canva becomes a stronger tool for creating polished graphics that look consistent, professional, and memorable.